hello over there

Welcome to my corner of the world. I'm so glad you're here. Join me in a conversation about how we build a bridge between daily life and the life we're longing for. As you explore, you'll discover stories, some of my favorite things, a whole lot of love, and perhaps even join me in a little lip syncing. Learn more about me right here.

(almost) weekly letters from my heart to you
upcoming ecourse

Come along to Tell It: 15 days of prompts and inspiration to feed your creative soul. Register right here.

in the shop

Bowls of heart pocket talismans have been gathering in the studio filled with the words and phrases kindred spirits are holding close this year. What is your word? You can find the talismans right here.

stay connected

Entries in pinned it. did it. (27)

Friday
Dec272013

pinned it. did it. {with meg}

Today, Meg is sharing just about everything you need to create a very special DIY New Year's Party. Love that these ideas would work for a party for 2 or 22. Read on for Meg's post.

*****

I will admit that I am a softie for a fun New Year’s celebration. I love the idea of getting all dressed up fancy and going out to celebrate the ringing in of a new year. I also love staying in and making a fun party at home. That’s what New Year’s will look like this year with a 2.5 year old at home and myself 5 and a half months pregnant. I’ve had so many ideas pinned on my Holiday board that I’ve been excited to do. We took down our Christmas decorations and put up some New Year’s decorations all in the same day. Sometimes it feels challenging to want to decorate for one holiday when it’s so close to another. Often times our Christmas decorations are still up on New Year’s Eve. But this year they came down as soon as Christmas was over so that we could get in the spirit for a new year to come. 


I modified a tutorial for making sparkly stars to hang from my mantle place. I didn’t want to hassle with glue and glitter, so I purchased scrapbook paper that was glittery with both silver and gold glitter. I made a free-hand star and cut out 9 to hang across the mantle. I used a needle and thread to hang them with string and simply just taped them to the top of my mantle. The only change I would make next time around is I’d either use double-sided paper or I’d cut enough to make them sparkly on both sides. They spin with a little air movement and I think it would be fun to have them sparkly on both sides.

I used the same scrapbook paper and cut out circles (free-hand again) of varying sizes and used a tiny hole punch to be able to string them on baker’s twine. I loved the look of this circular garland and decided to fashion one for one of our very large living room windows. I made two strands and hung them at varying lengths. It adds a fun touch of sparkle to the room. 


Then I cut out some stars to embellish our champagne glasses and the food on the table. Some of them I attached to glassware and others I taped to toothpicks to add to brie and to some hummus. These little stars were inspired by a photo I saw for Blackberry Goat Cheese Crackers. What a yummy appetizer they would make! 


I also made some Spritz cookies which are a Christmas tradition in my family. This year I made them for New Year’s and used some silver sparkly sprinkles to decorate them. You can find the recipe that my family has used for generations over on my blog


And last of all, we will top off the New Year’s celebration with New Year’s Eve Popcorn. It follows the same recipe and process as the Party Popcorn that we’ve told you about in the past. But this one uses silvery sprinkles and these edible stars by Wilton. This popcorn is so incredibly festive! 

There are so many more ideas I’d love to explore for a New Year’s party. Here are a few of my favorites:

DIY Cheeky New Year’s Eve Party Favors + Printable Tags
White Chocolate Dipped Cherries
Metalic Bunting
DIY Confetti Poppers 
Drink Stir Sticks
DIY Mini Hat Headband
Midnight Kisses

Do you have fun plans for New Year’s Eve this year? I’d love to hear about your plans and parties and how you like to ring in a new year. Are you making things for a party or are you keeping it quiet this year? Share your ideas with us in the comments. Best wishes for a happy and healthy new year to you all. XO


Meg Brothers is an artist, photographer, mama, and dreamer. She loves cooking, tattoos, and sporadic dance parties in the kitchen. She prefers dark chocolate, black coffee, and flip flops when weather permits. She is a lover of Pinterest and truly believes in integrating ideas and inspiration - big or small - into normal life. Meg lives in Denver, Colorado with her husband, Dustin and son, Julian. Meg writes about photography, family, and creative inspiration at megbrothers.com. Find her on Pinterest here and on Twitter here

***

Note from Liz: Over here in my corner, I'm trying to "use Pinterest for good." I really see it as a community of people trying to see the beauty and possibility in their lives. I'm adding a few new features here on my blog inspired by or directly about Pinterest as a way to invite others to look for this beauty within a social media community. Connect with me on Pinterest here. Read other "Pinned it. Did it." columns here.

Tuesday
Dec172013

pinned it. did it. {with meg}

Meg is sharing about one of my favorite things: bunting! There is so much great inspiration for these kinds of flags on Pinterest and I love the variety Meg shares with us today.

*****

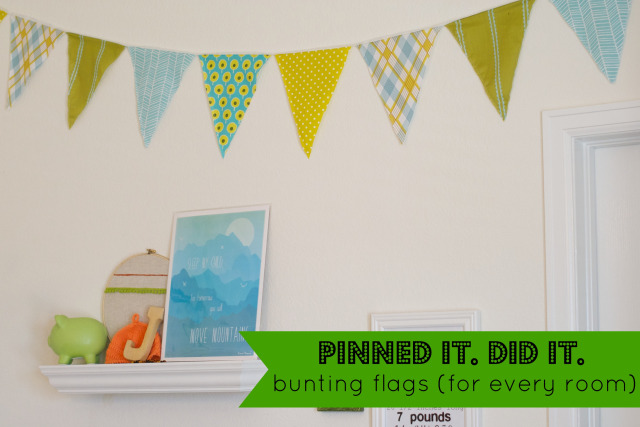
I may be a little obsessed with making these bunting flags. There are some easy tutorials on Pinterest but once you get the basic idea, they are easy to elaborate on and change to make personal. It’s amazing how festive a little banner can make any event or any room for decoration. They are just so cheerful. 

I made the one pictured above for my son’s bedroom. I used fabric and sewed it with bias tape. I started with a cardboard template for the flags and just measured the wall to know how many to make. I folded bias tape over the top edge and sewed along the edge. This is a nice way to make the banners with fabric and provides a nice edge. I hang it on the wall with some small push pins. 


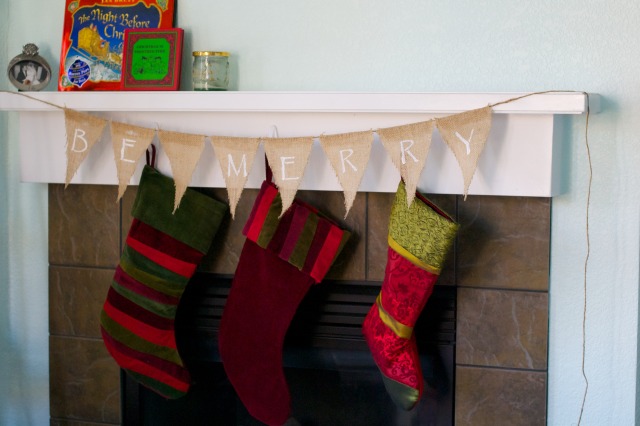
I made this “Be Merry” one for our fireplace for Christmas this year (I am also a portrait photographer and used it as a photography prop in some holiday photos this year). This one used twine and burlap. I bought alphabet stencils and white paint and stenciled the words onto the burlap. I used a strong glue to glue the flag around the burlap since I didn’t want there to be any lines on the flags. These were a smaller triangle. I love how it’s festive but simple. 

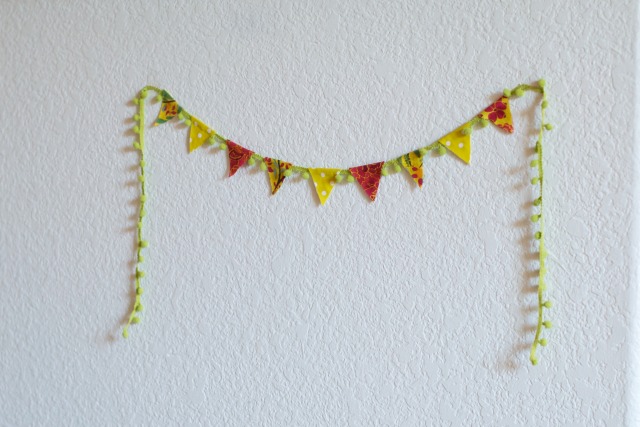
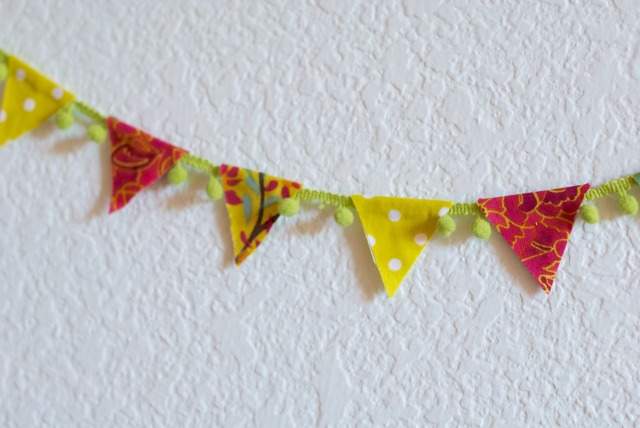
Today I sat and made this mini bunting flag for a Christmas gift for my niece. It’s small enough to use as decoration with her My Generation doll (similar to an American Girl doll). For this one I used fabric flags and instead of cutting triangles, I cut diamonds. I then folded the diamonds over a piece of yarn and glued so they would be sturdy and decorative on both sides. I am so in love with the way it turned out (and those colors!) and love the touch of fun that the green pompom ribbon adds. 

Other flag inspiration ideas: 

Cake topper bunting flag
Tissue tassel banner flag
Washi tape banner flag
Chalkboard bunting banner

I have so many DIY projects lined up for my home. I’m feeling really inspired lately to adorn the walls with photos I’ve taken and art I’ve made. It’s amazing how adding a few homemade touches makes my space go from feeling good to great.

Have you been doing any fun DIY projects lately? Tell us about them! I love to hear about what you are up to these days. Share in the comments today.


Meg Brothers is an artist, photographer, mama, and dreamer. She loves cooking, tattoos, and sporadic dance parties in the kitchen. She prefers dark chocolate, black coffee, and flip flops when weather permits. She is a lover of Pinterest and truly believes in integrating ideas and inspiration - big or small - into normal life. Meg lives in Denver, Colorado with her husband, Dustin and son, Julian. Meg writes about photography, family, and creative inspiration at megbrothers.com. Find her on Pinterest here and on Twitter here

***

Note from Liz: Over here in my corner, I'm trying to "use Pinterest for good." I really see it as a community of people trying to see the beauty and possibility in their lives. I'm adding a few new features here on my blog inspired by or directly about Pinterest as a way to invite others to look for this beauty within a social media community. Connect with me on Pinterest here. Read other "Pinned it. Did it." columns here.

Wednesday
Dec112013

pinned it. did it. {with doña}

I'm delighted to welcome another guest today. Doña Bumgarner is sharing a fantastic project she did with her little one this fall. As we look toward winter around the corner, it would be fun to create these salt dough ornaments with snowflakes or other winter-themed shapes.

Thanks for such a great project Doña and for sharing some great resources below.

***

My daughter is not quite 3 years old and this month she quit napping.  It has been a hard transition for both of us and the middle of the afternoon often finds us both exhausted and mean.

On one such afternoon, when the stretch to dinner and bedtime seemed interminable, I turned to Pinterest for inspiration.

I have few boards of activities for little ones, but on this day I remembered reading something about using sensory input to calm overwrought toddlers, so I pulled up the sensory activities board.  I needed a project that didn’t require a trip to the store, because there was no way we were going to manage that.

Salt dough leaf ornaments.  Perfect. Easy to make, short list of ingredients and supplies, and fast.

I pulled out the mixing bowl and flour jar and Bean came running into the kitchen to see what I was doing. She loves to help me cook (and I try to let her, even when it takes much longer) so she was immediately hooked. And then when I told her she could mix the dough with her hands? She was in heaven.


The dough was warm from the water and the texture was similar to the Play Doh that she loves. And the impact was immediate. As soon as she got her hands in that bowl I felt her energy unwind. It was magic. She tasted it and smelled it and told me it felt soft and squishy in her hands.

I let her mix as long as she wanted, and then I divided the dough while she picked the dye colors. The original recipe used powdered tempura paint, which I didn’t have, so I substituted food coloring. This didn’t work very well and stained my hands, so if you try this at home, use the powdered paint as suggested or mix the color into the water before making the dough. She likes purple, so along with the standard leaf colors, we made a ball of purple dough.

I helped her roll out and cut the shapes and that was about the end of her interest for the day. I settled her with a TV show while I finished up by poking holes in the leaves for hanging and put them in my dehydrator to dry. You can also use an oven set on low for this step.

She was so excited about the leaves we’d made and showed them to her father as soon as he got home from work.


The rest of the project was split over a few days, continued whenever she indicated interest. One night after dinner we painted the leaves with Mod Podge (I highly recommend their washable version when you are crafting with little kids!). Another afternoon we went for a walk around the neighborhood to find a branch to hang them on. 


Then two or three ornaments at a time, because this part was more frustrating for her, we cut lengths of thread and hung them on our branch, which adorned our kitchen counter for a few days until our boy cat decided it was fun to play with.

What I loved about this project was that it was so simple and so accessible. I also loved that it gave us something to come back to over the course of a week. But the best part was it reminded me that when Bean is having a really rough day I can try to bring her back to center by introducing a project that engages her senses. That’s an awesome mama trick to keep in my back pocket.

If you’d like to see the other sensory activities I have pinned, that board is here. You can also check out my boards for arts and crafts with kidseducational play, and self-directed toys and busy bags

***

Doña Bumgarner is a writer, artist, mama and a craft project-collector from way back. She loves Pinterest and uses it to help solve a household dilemma at least once a week (see her “pinned and done” board here)  She lives in Santa Cruz with her partner, their little one and his almost grown one, and a collection of cats and chickens. She writes about the importance and struggles of moms with little ones to hold space for their own well being in the midst of raising a family on her blog, Nurtured Mama

Note from Liz: Over here in my corner, I'm trying to "use Pinterest for good." I really see it as a community of people trying to see the beauty and possibility in their lives. I'm adding a few new features here on my blog inspired by or directly about Pinterest as a way to invite others to look for this beauty within a social media community. Connect with me on Pinterest here. Read other "Pinned it. Did it." columns here.

Wednesday
Dec042013

pinned it. did it. {with meg}

Meg's sharing another recipe today! It's perfect for this time of year and for those of us who want to try cooking without gluten but keep wondering if what we make will really taste as good as we hope.

****

It’s no secret that I like things made with pumpkin. And with it being the holiday season and just after Thanksgiving here in the U.S., I’m tempted to have a pumpkin treat each day. It just seems festive and appropriate. So I decided to start with a recipe that I’ve been wanting to try for a long time now - and I am so glad I did.


These pumpkin mini muffins are grain-free. They are also dairy-free and refined sugar-free. I admit to being a bit skeptical of the end result. As someone who has been in and out of various dietary restrictions over the years, I have had my fair share of disappointing baked goods. However, I was thrilled at the outcome of these muffins. They are incredibly soft, fluffy, spongy, and bare no resemblance to any dense or gritty grain-free recipe I’ve tried thus far. I would serve these to anyone and am willing to bet that no one would realize that they are not the typical flour and sugar made muffin. 

In our house, we love Justin’s Almond Butter**. In this recipe, I used the honey almond butter. The end result has a very subtle nutty taste, much less noticeable than if I’d used peanut butter. We did not have mini chocolate chips on hand, so we sprinkled the tops of a few with regular chocolate chips. (Keep in mind if you are dairy-free or have allergies, you will obviously need to use something like the chocolate chips made from Enjoy Life. They are dairy, nut, gluten, and soy free). These muffins are also delicious without the chocolate chips. They would be great with the addition of chopped nuts or a touch of cream cheese-type filling. There are so many possibilities for expanding this recipe. 


They whip up with only 8 ingredients (9 with the chocolate) in the blender and bake at a very quick 7-8 minutes. They also keep nicely in the freezer for up to 4 months. I will be baking a few batches at a time and freezing them for a quick breakfast in the cold months to come. 

What pumpkin goods have you been making lately? Are you enjoying the pumpkin season as much as I am or are you someone who doesn’t care for it? Wishing you all in the U.S. a happy Thanksgiving this week and sending love to our readers all around the globe.  

**This almond butter can be expensive. We find really good deals at regular grocery stores and health food stores. I got two 16oz jars on a buy one get one free sale at my regular grocery store for $10 so be sure to watch the sales!**


Meg Brothers is an artist, photographer, mama, and dreamer. She loves cooking, tattoos, and sporadic dance parties in the kitchen. She prefers dark chocolate, black coffee, and flip flops when weather permits. She is a lover of Pinterest and truly believes in integrating ideas and inspiration - big or small - into normal life. Meg lives in Denver, Colorado with her husband, Dustin and son, Julian. Meg writes about photography, family, and creative inspiration at megbrothers.com. Find her on Pinterest here and on Twitter here

***

Note from Liz: Over here in my corner, I'm trying to "use Pinterest for good." I really see it as a community of people trying to see the beauty and possibility in their lives. I'm adding a few new features here on my blog inspired by or directly about Pinterest as a way to invite others to look for this beauty within a social media community. Connect with me on Pinterest here. Read other "Pinned it. Did it." columns here.

Tuesday
Nov052013

pinned it. did it. {with meg}

Meg is sharing another Pinned it. Did it. adventure today. I've seen these "salad in a jar" pins and always wondered, "Does it really work?" Her answer might just get me to try it. 

*****

Occasionally while I’m browsing on Pinterest, I come across something and think, “why didn’t I think of that?” This is one of those very things: Salad in a jar. I really like to eat salad. I like to get creative with the ingredients and I am adventurous in experimenting with my own dressings and combinations. But sometimes I struggle to use up the salad vegetables before they go bad. This is a great solution to that problem and makes eating a salad for lunch (or dinner) even easier than eating fast food.

A friend of mine posted in a group I’m in about doing this method for preparing salads. She noted that they lasted and stayed fresh for the entire work week. And I knew it was something worth trying in our house. I bought a 9 pack of Mason Jars for around $10. I purchased wide-mouth jars so they would be easy to fill and wash. I bought jars that are a pint and a half in size.  

Last week we made caesar salads. The order in which you fill the jars does matter. The idea is to start with the dressing on the bottom so that it doesn’t make the rest of the contents soggy. So we layered caesar dressing, grilled chicken, parmesan cheese, and romaine lettuce. By the end of the week the lettuce was still crispy with no signs of wilting or rusting. I don’t like to leave chicken in the fridge longer than 5 days so we were sure to eat all 9 salads (between my husband and myself) by the end of the week. 

What I love about this is that with about 20 minutes of prep work, we had lunches prepped for both of us for the whole week. It was so great to pull a jar from the fridge, give it a good shake, and enjoy it. And I did the math and each caesar salad worked out to be $1.72 each. Today I am prepping another batch of salads for our week: BBQ Chicken Chopped Salad, yum!  

I’ve created a board for salad inspiration and ideas. Here are a few we’re excited to try next:

If you would like to join me in pinning to this salad board, leave us your Pinterest user name in the comments section below and I will gladly invite you to pin to this board with me. Or share the link or recipe for your favorite salad for us all to try. 


Meg Brothers is an artist, photographer, mama, and dreamer. She loves cooking, tattoos, and sporadic dance parties in the kitchen. She prefers dark chocolate, black coffee, and flip flops when weather permits. She is a lover of Pinterest and truly believes in integrating ideas and inspiration - big or small - into normal life. Meg lives in Denver, Colorado with her husband, Dustin and son, Julian. Meg writes about photography, family, and creative inspiration at megbrothers.com. Find her on Pinterest here and on Twitter here

***

Note from Liz: Over here in my corner, I'm trying to "use Pinterest for good." I really see it as a community of people trying to see the beauty and possibility in their lives. I'm adding a few new features here on my blog inspired by or directly about Pinterest as a way to invite others to look for this beauty within a social media community. Connect with me on Pinterest here. Read other "Pinned it. Did it." columns here.